Quantum Random Number Generator
- Alyona Kosobokova

- Feb 21, 2021
- 3 min read
Updated: Apr 29, 2021
True randomness is an extremely interesting mathematical, physical, philosophical, and even poetic discussion. As known, classical computers are not really capable of generating truly random numbers. They use inner clocks and complicated algorithms to return what's called pseudorandomness. Quantum Computers on the other hand utilizes the probabilistic nature of our physical world to generate a random number.
We used a five-qubit IBM Quantum Computer to 'get a random integer from the Universe'.
By following this post step by step, you could create a simple quantum circuit, send a request to IBM Quantum Experience, run the code on a Quantum Computer and get your first truly random number.
First, go ahead and create a free IBM Quantum Experience account. We will need the API Token, which you can find on the 'My Account' page.

Next, make sure you have a Jupiter Notebook, or any kind of other Python editor set up. If you don't have a Python environment set up on your local machine, and don't want to bother setting it up, I recommend using Google Colab, an online Python editor. Sign in to your Google account and create a new notebook.
You will need to install qiskit. If you are using Google Colab type and run.
!pip install qiskitIf you are using your local environment, go to the terminal and depending on your package-management system run a command to install qiskit. I use pip on my machine.
pip install qiskitNow we are ready to create a quantum circuit. Open your Jupiter notebook or Google Colab editor and import qiskit.
import qiskit as qsTo get access to the Quantum Computers (backends) currently available to your account type
qs.IBMQ.enable_account('put your API key here')
provider = qs.IBMQ.get_provider(hub='ibm-q')
IBM has a number of Quantum Computers. In this example, I used 5 qubits ibmq_quito. I noticed, it usually has the shortest queue so you wouldn't have to wait too long to execute the code. If interested, follow the link to see the list of Quantum Computers available to you.
backend = provider.get_backend('ibmq_quito')Next, we need to create what's called quantum registers, or basically initiate our qubits. For this circuit, I used all five qubits available on the bmq_quito. Classical registers are used to store the bits after the qubits are measured.
q_register = qs.QuantumRegister(5, 'q ')
c_register = qs.ClassicalRegister(5, 'c')
Next, let's initiate the circuit.
q_circuit = qs.QuantumCircuit(q_register,c_register)All qubits are initiated in the state |0>. We used Hadamard gates to put qubits in a superposition of the states |0> and |1>.
q_circuit.h(q_register)Now each individual qubit is in a state of superposition, which means that it has a 50% probability of collapsing to |0> and a 50% probability of being |1>. For each individual qubit, it's random. Or, at least, that is the commonly accepted view on the interpretation of quantum mechanics.

When the quantum particle is measured it collapses to a defined value. In quantum computing, qubit when measured collapses to a bit. The following line adds a measure operation to each of our five qubits, and stores output values in our classical registers.
q_circuit.measure(q_register,c_register)It's always good to see what the circuit looks like.
q_circuit.draw()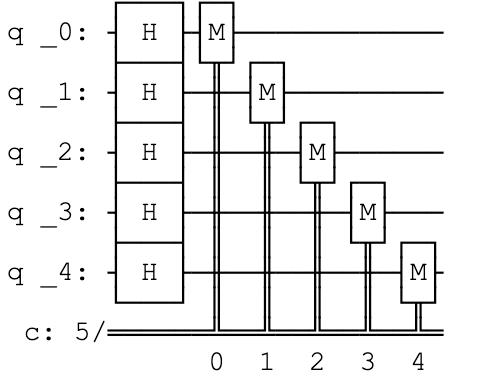
And finally, execute the quantum circuit, and see your first truly random number!
job = qs.execute(q_circuit, backend, shots=1)
print('Executing Job...\n')
result = job.result()
values = result.get_counts(q_circuit).keys()
binary = list(values)[0]
decimal = int(binary, 2)
print('Binary', binary, 'Decimal', decimal)
The first time I ran the code – I got 10. I hope you enjoyed your first truly random number!


Comments